How to Restore Your Rims Like a Pro – Step-by-Step Guide!
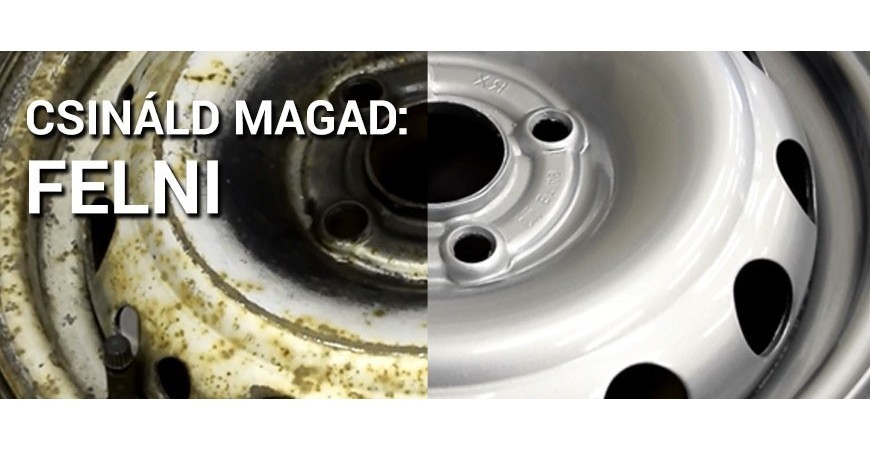
The rims are one of the most defining elements of a car’s appearance, but the harsh challenges of the road—stone chips, corrosion, and brake dust—take their toll over time. If you want to restore the original beauty of your wheels without taking them to an expensive workshop, refurbishing your rims at home is a great solution! Let’s go through the steps you need to follow for a perfect result.
In this article, we cover:
In this video, we will guide you through the entire rim restoration process, from introducing the necessary tools to the final touches. You’ll learn how to apply paint evenly, avoid common mistakes, and achieve a premium-quality finish on your rims—all by yourself, in your own garage.
The best method for surface preparation is sandblasting, but to keep the process manageable at home, we opted for manual sanding. This can take 3-4 hours for four rims, depending on their condition. If the damage is extensive, consider using a power tool or taking them to a professional for cleaning. We chose a standard Opel silver base coat and had it filled into a car paint spray can.
What tools do you need before painting your rims?
For a successful restoration, it’s essential to gather the right tools and materials. Having everything ready will not only speed up the process but also ensure a more precise outcome.
Essential tools and materials:
✅ Rim cleaner – Removes stubborn dirt and grime.
✅ Wire brush or steel wool – For cleaning the surface and removing oxidation.
✅ Sandpapers (various grits: 240, 400, 800, 1200) – For smoothing the surface and sanding between layers.
✅ Rust converter – Recommended for stopping further rusting.
✅ Silicone remover – For degreasing the surface.
✅ Masking tape and protective film/paper – To protect areas that shouldn’t be painted.
✅ Respirator mask – For health protection.
✅ Rim primer, rim paint, and clear coat – For the final look and long-term protection.
TIP: If you’re looking for a quicker and more convenient solution, consider a rim restoration kit, which contains all the necessary materials.
How to prepare the rims for painting?
Proper preparation of the rims is key to achieving a durable and aesthetically pleasing finish.
1️⃣ Removing the wheels
Although it’s possible to work on the rims while they are still mounted on the car, it is much more precise and safer to remove them. This way, you can avoid accidentally spraying paint onto the car’s bodywork or brake components.
2️⃣ Thorough cleaning and degreasing
- Use a rim cleaner to remove dirt, oil, and brake dust.
- Use a wire brush or steel wool to remove stubborn contaminants.
- Thoroughly degrease the surface with silicone remover to ensure the paint adheres properly.
3️⃣ Sanding and rust removal
- If the rim surface has oxidized or paint has chipped off, first use a wire brush and then sandpaper (240 and 400 grit) to smooth it out.
- For rusty areas, use a rust converter and then gently sand the surface smooth after it has dried.
- Finally, use 800-grit and 1200-grit sandpaper to finish the surface for a perfectly even texture.
4️⃣ Masking – Protecting unwanted areas
- Use masking tape to cover the valve stems, inner parts, and any areas you do not want to paint.
- If you don't remove the tires, it's also a good idea to cover them with protective film or paper to prevent paint from getting on them.
Rim painting – Step by step
After preparation, it’s time to start painting!
1️⃣ Priming
- Use a special filler primer to ensure proper adhesion and smooth out imperfections.
- Spray a thin layer and allow it to dry completely (follow the manufacturer’s recommended time).
- Once dry, lightly sand with 800-grit sandpaper for a smooth finish.
2️⃣ Painting
- Choose a durable rim paint or metallic + 2K clear coat spray for maximum protection.
- Apply several thin layers, waiting 10-15 minutes between each coat.
- Maintain an even spraying distance (about 20-30 cm) to avoid drips and runs.
3️⃣ Clear coating – For long-lasting protection
- Once the paint has fully dried, apply the protective clear coat to shield the rims from scratches and environmental damage.
- Apply multiple thin layers and follow the drying times carefully.
Reinstalling the rim and final touches
Once the paint and clear coat have completely dried:
✅ Remove the masking tape and protective film.
✅ Reinstall the valve caps and any removed parts.
✅ Mount the wheels back on the car and tighten the bolts to the correct torque.
✅ Avoid high-pressure washing or chemicals for the first few days to let the paint cure properly.
Video tutorial: DIY rim painting
Restore Your Rims Like a Pro