Primer Spray 101: Which Automotive Primer Do You Need?
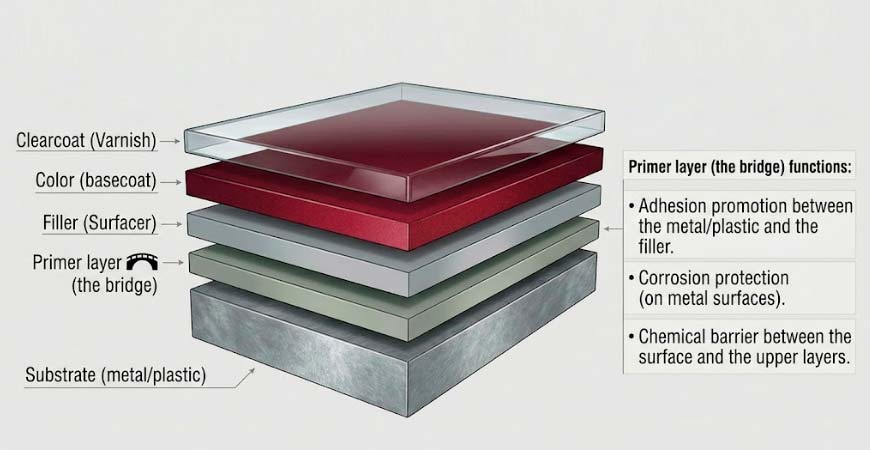
When it comes to painting, primer spray is the layer that quite literally determines everything: it governs how well the topcoat adheres, how smooth the surface will be, and whether the finish will still resist rust, stone chips and weather years down the line. A well-chosen primer creates a stable “bridge” between the substrate (metal, plastic, old paint) and the topcoat, while it levels minor defects and seals the surface.
In this guide we’ll walk through the most important primer spray types – acrylic, plastic, filler and anti-corrosion primers – and use practical examples to help you decide which one to use and when for DIY repairs or more demanding home respray projects.
Contents...
1. What does primer spray actually do? 2. Main types of primer sprays — Acrylic primer spray — Plastic primer spray — Filler (high-build) primer spray — Anti-corrosion primer spray — 2K primer spray (pro-grade aerosol)
What does primer spray actually do?
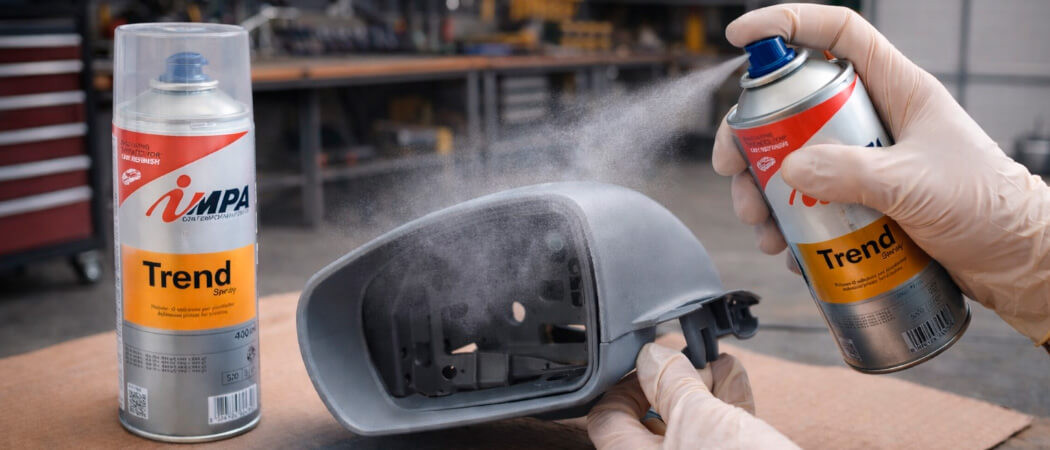
Primer spray behaves just like traditional primers: it creates an adhesion-promoting layer between the substrate and the topcoat, levels micro-defects and protects the surface against corrosion. The only real difference is the packaging – in an aerosol can, so you don’t need a spray gun, compressor or mixing. Shake the can, do a test spray, and you’re ready to work.
Typical situations where primer spray makes your life much easier:
- repairing small stone chips and scratches on body panels,
- respraying bumper damage, trims or mirror housings,
- treating local rust spots, drilled holes and cut edges,
- household / DIY projects (shelves, garden furniture, bike parts, etc.).
It’s important to understand that most primer sprays are 1K systems (they air-dry), so they’re simpler and faster to use, but in terms of durability they can’t fully match gun-applied 2K epoxy and filler systems. For smaller repairs and DIY work, however, they are ideal. If you’re looking for a more professional solution, you’ll also find 2K primer sprays in the CarColor online store.
Main types of primer sprays
In automotive use you’ll mostly work with four core primer spray families – everything else is some variation on these:
- Acrylic primer spray – general-purpose, fast-drying, universal primer.
- Plastic primer spray – adhesion promoter for plastic parts.
- Filler (high-build) primer spray – for filling scratches and sanding marks.
- Anti-corrosion primer spray – for corrosion protection on metal surfaces.

On top of these you have 2K primer sprays, where the base and hardener are in separate chambers in the same can – once you activate the valve you get a “mini 2K” system in aerosol form.
Acrylic primer spray – the universal all-rounder
Acrylic primer spray is the most common primer aerosol: it’s single-component, dries quickly, sands easily and adheres well to most properly prepared surfaces (sanded metal, existing paint, smaller repaired areas and in some cases even wood).
Key characteristics:
- 1K system: no mixing, just shake and spray.
- Fast drying: ideal for small repairs where time matters.
- Good sandability: typically matte grey / white / black shades that can be sanded smooth before colour application.
- Universal use: perfect for stone chip repairs, small dent repairs and as a base under touch-up pens.
As a DIY user this will be the spray you grab most often as your “general primer” when the surface mainly needs adhesion and there are no serious rust issues or deeper defects.
Related category: Acrylic primer sprays
Plastic primer spray – adhesion on flexible substrates
Plastic primer spray (adhesion promoter) is formulated specifically for typical automotive plastics – PP, ABS, PVC and others. On smooth, flexible plastic surfaces paint doesn’t like to stick on its own and tends to chip off. Plastic primer forms a very thin, almost invisible layer that creates a chemical “bridge” between the plastic and the topcoat.
Typical applications:
- painting or repairing bumpers, trims and mirror housings,
- refinishing interior and exterior plastic parts,
- long-lasting paint jobs on other plastic items (garden furniture, covers, housings, etc.).
Most plastic primer sprays are colourless or very light, so they don’t influence your final colour. Before use, always clean, degrease and, if necessary, lightly scuff the plastic to get the best possible adhesion.
Related category: Plastic primer sprays
Filler (high-build) primer spray – for a smooth surface
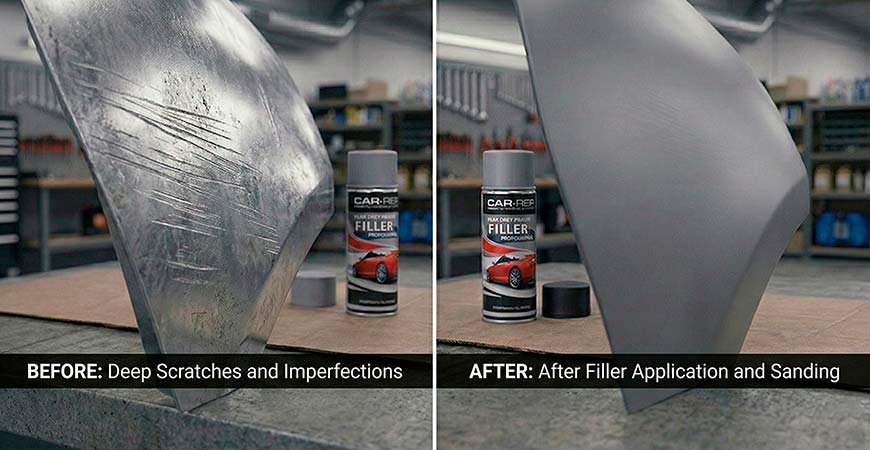
Filler primer spray (often called high-build or spray filler) is a high-solids aerosol that lays down a thicker, sandable layer. Its job is to fill small scratches, sanding marks and micro-dents and bring the surface as close to perfectly level as possible before colour and clearcoat.
Typical use cases:
- fine-leveling of repaired, filled areas,
- smoothing around stone chip repairs,
- blending in sanded edges of existing paint.
In practice it’s best applied in several light coats and then sanded with fine paper (e.g. P400–P600) once fully dry. This gives you an almost glass-smooth base for your topcoat. On large panels it’s usually more economical to use gun-applied 2K filler, but for smaller repairs spray filler is an excellent compromise.
Related category: Filler primer sprays
Anti-corrosion primer spray – when rust is the enemy
Anti-corrosion primer spray is designed specifically for protecting metal surfaces against rust. It contains special anti-corrosion pigments (such as zinc phosphate) that actively help prevent rust from forming and spreading—provided the surface has been properly cleaned beforehand.
Where it shines:
- local repairs of smaller body rust spots,
- treating cut edges, drilled holes and weld seams before painting,
- quick corrosion protection on steel brackets, mounts and other parts.
Important: anti-corrosion spray is not a miracle cure for heavy, flaky rust. Loose rust should always be removed mechanically (sanding, wire brushing) or chemically, and only then should you apply the primer. For serious, large-scale corrosion, a gun-applied 2K epoxy system is the better long-term solution – the spray is primarily for localised repairs.
Related category: Anti-corrosion primer sprays
2K primer spray – professional protection in an aerosol can
2K primer spray sits in a category of its own: the base and hardener are stored in separate chambers inside the can, and you “activate” the mixture by triggering a special valve. From that moment the material behaves just like a professional, gun-applied 2K primer – only in a convenient, portable aerosol.
Advantages:
- Stronger, more chemically resistant film compared to standard 1K sprays.
- Better corrosion protection and adhesion on bare metal and problematic substrates.
- Great choice when you don’t have a spray gun but still want 2K-level performance.
The downside is that once activated, the product has a limited pot life – it will eventually cure inside the can as well. That’s why it’s best used when you know you’ll use up most of it (for example, on a larger repair or when priming an entire panel).
2K primer spray category: 2K primer sprays
Which primer spray should you choose? – quick decision guide
The ideal primer spray always depends on what you’re spraying onto and what you want to achieve (adhesion, smoothing, corrosion protection). Use this simple “decision tree” as a starting point:
- Type of substrate:
– plastic bumper, trim → plastic primer spray + (if needed) acrylic primer / filler primer;
– sound, existing paint → acrylic primer spray or direct filler primer spray (depending on condition);
– bare, rust-free metal → acrylic or 2K primer spray (if maximum durability is important);
– light surface rust on metal → remove rust first + anti-corrosion primer spray. - Nature of the job:
– only adhesion is needed → acrylic or plastic primer spray;
– surface levelling → filler primer spray;
– stopping rust → anti-corrosion primer spray (with thorough prep). - Expected durability:
– quick, small DIY touch-up → 1K sprays (acrylic, filler, plastic, anti-corrosion);
– more long-term protection on valuable parts → 2K primer spray with a proper layer system.
| Type | Substrate | Main advantage | Main drawback | Recommended use |
|---|---|---|---|---|
| Acrylic primer spray | Metal, existing paint | Universal, fast, easy to sand | 1K system, moderate chemical resistance | Small body repairs, general-purpose priming |
| Plastic primer spray | PP/ABS/PVC plastics | Adhesion promotion on flexible surfaces | Only suitable for plastics | Bumpers, trims, mirror housings before painting |
| Filler primer spray | Repaired, scratched areas (not bare metal) | Fast surface levelling, easy sanding | Less economical on large surfaces | Small spot repairs, around stone chips |
| Anti-corrosion primer spray | Steel (local areas) | Quick and simple corrosion protection | 1K system; insufficient for severe rust | Small rust spots, cut edges, drilled holes |
| 2K primer spray | Bare metal, problematic substrates | True 2K durability in an aerosol | Limited pot life after activation | Higher-value parts, more demanding DIY restorations |
How to use primer spray step by step
Choosing the right type of spray is only half the story. The other half is how you apply it. A few basic rules are worth following every single time:
- Thorough cleaning and degreasing:
Wash the surface, remove salt, tar and general contamination. Then use a dedicated degreaser so the surface is completely free from grease and wax. - Sanding and matting:
The goal isn’t a mirror finish, but an evenly matte surface. Work repaired areas with progressively finer papers (e.g. P240–P400, then around P600) to avoid sharp steps between old paint and the repair. - Masking:
Mask off anything you definitely don’t want to prime. On edges it’s better to build up coverage with several light passes rather than laying down a heavy build in one go. - Shake the can and do a test spray:
Shake the primer spray for at least 2–3 minutes so pigments and binders are properly mixed. Always spray a test pattern onto a piece of cardboard to check the spray pattern. - Distance and movement:
As a rule of thumb, keep about 20–25 cm from the surface and move in smooth, overlapping passes. Don’t stop and “dump” product in one spot – that’s a guaranteed run. - Several thin coats instead of one heavy coat:
Never try to achieve full coverage in a single pass. 2–3 light coats produce a much nicer, run-free and more durable result than one thick layer. Respect the flash times printed on the can between coats (fast acrylic primers typically need 10–15 minutes at around 20 °C). - Temperature and humidity:
Ideally spray at 18–25 °C with low to moderate humidity (preferably under 60% relative humidity), protected from dust and draughts. Extreme heat, high humidity or cold make it much more likely that the film turns orange-peely, dull or patchy. - Drying, sanding, topcoat:
If the primer is a sandable type (acrylic or filler primer spray), sand and smooth it with fine paper after the recommended drying time. Then you can apply the colour coat and, if the system requires it, the clearcoat.

Common mistakes when using primer spray
- No plastic primer on plastics: if you skip the plastic adhesion promoter, paint tends to chip and peel – especially on bumpers and trims.
- Spraying straight over active rust: on loose rust and layered, lifting paint, primer only hides the problem, it doesn’t fix it. Always remove as much as possible first.
- Too much product in one pass: leads to runs, wrinkling, slow drying and later cracking – several thin coats almost always look and perform better.
- Dirty, greasy surface: causes cratering, pinholes and loss of adhesion – most paint defects are down to poor prep, not the product.
- Too wet or too dry conditions: in high humidity the film can dry dull and “hairy”; in very hot conditions it can flash too fast and develop orange peel.
- Layer incompatibility: some 1K products don’t like aggressive 2K materials sprayed over them too soon – always follow the manufacturer’s recommendations.
Frequently asked questions about primer sprays (FAQ)
Do I always need a primer spray before painting?
No, not in every single case, but in many situations it is strongly recommended. If you’re working on bare metal, repaired areas or plastic, primer spray provides adhesion and protection. On a sound, properly sanded clearcoat you can sometimes get away with just scuffing and repainting in certain systems – but for DIY work, using a primer almost always makes the result safer and more durable.
Can I spray primer over old, flaking paint?
Only if you completely remove the bad areas first. Any lifting or blistered paint has to be stripped or sanded back to a stable base, otherwise the new layers will come off together with the unstable old ones. Well-adhering, evenly sanded old paint, however, is a good substrate under acrylic or filler primer spray.
How many coats of primer spray should I apply?
As a general guideline, 2–3 light coats work best. For adhesion promoters (plastic primers), one very light “mist” coat is often enough; for filler primers the number of passes depends on how deep the defects are – 2–3 or more, always allowing proper flash time and avoiding runs.
How long should I wait before spraying colour over the primer?
This varies from product to product, but fast acrylic primer sprays typically allow colour application after 10–15 minutes (around 20 °C). If you plan to sand the primer, give it extra time to harden. The manufacturer’s instructions on the can are always the final authority.
Is primer spray enough to stop rust on its own?
On small areas of light surface rust that you have thoroughly sanded and degreased, a good anti-corrosion primer spray can indeed help stop the rust from returning. On deeper, perforated or structurally weakened sections you’ll need proper metal repair and welding – no paint alone can solve that.
Can I use the same primer spray on both metal and plastic?
Acrylic primer spray may adhere to certain pre-treated plastics, but on bare plastic the right choice is always a plastic primer spray. On metal and existing paint, acrylic, filler or anti-corrosion sprays are the best options; on plastic, always start with an adhesion promoter.
How can I avoid an “orange-peel”, uneven primer surface?
The most common causes of orange peel are too much distance, a very hot surface/air temperature, high humidity or a coat applied too “dry”. Try working closer to the panel (around 20–25 cm) with slower, overlapping passes, using several light coats and avoiding extreme weather conditions.
Can I just spray primer on the repaired area and leave it without colour?
As a short-term, temporary protection, yes – but it’s not ideal long term. Primers are usually more porous than a full colour + clear system, so over time they can allow moisture to work its way through. For a lasting repair, always finish the primed area with the appropriate colour and, where required, a clearcoat.
Summary
Primer spray is one of the most useful DIY tools in automotive refinishing: it lets you carry out neat, professional-looking repairs without a compressor and spray gun – as long as you pick the right type and follow a few basic rules.
For general small repairs, acrylic primer spray will be your go-to all-rounder; for plastic parts always use a plastic primer first; if you want a smoother surface, reach for filler primer spray; and when rust is the issue, anti-corrosion primer spray adds an extra layer of protection – but only after thorough surface preparation. If you want to step up a level in durability while still working with aerosols, 2K primer spray is an excellent bridge towards full 2K gun systems.
Good priming always pays off: you get a topcoat that sprays more easily, covers more evenly, lasts longer and causes fewer headaches. If you’re unsure which way to go, base your choice on the substrate type, the nature of the damage and the durability you expect – that way your primer spray will genuinely deliver the results you’re looking for.

Related products


In stock
4,724 Ft
(tax incl.)
Online price

In stock
3,378 Ft
(tax incl.)
Online price


In stock
4,191 Ft
(tax incl.)
Online price


In stock
3,683 Ft
(tax incl.)
Online price
1K Epoxy Primer is a high-quality universal primer for the pre-treatment of steel, stainless steel, galvanized steel, aluminium and anodised aluminium. Extremely suitable as a primer for pre- treatment before applying...


In stock
3,175 Ft
(tax incl.)
Online price


In stock
3,175 Ft
(tax incl.)
Online price

In stock
3,175 Ft
(tax incl.)
Online price


&media=https://www.carcolor.hu/shop/12199-large_default/car-rep-acryl-primer-gray-500ml.jpg)
&media=https://www.carcolor.hu/shop/12238-large_default/car-rep-professional-filler-gray-400ml.jpg)
&media=https://www.carcolor.hu/shop/12217-large_default/car-rep-anty-rust-primer-white-400ml.jpg)
&media=https://www.carcolor.hu/shop/7591-large_default/1k-plastic-primer-spray-400-ml.jpg)
&media=https://www.carcolor.hu/shop/12202-large_default/car-rep-acryl-primer-black-500ml.jpg)
&media=https://www.carcolor.hu/shop/12208-large_default/car-rep-anty-rust-primer-grey-400ml.jpg)
&media=https://www.carcolor.hu/shop/12205-large_default/car-rep-acryl-primer-feher-500ml.jpg)
&media=https://www.carcolor.hu/shop/15442-large_default/2001-universal-primer-spray-400ml.jpg)
&media=https://www.carcolor.hu/shop/16671-large_default/car-fit-1k-epoxy-primer-400ml.jpg)
&media=https://www.carcolor.hu/shop/7593-large_default/car-fit-1k-hi-build-primer-filler-spray-gray-400-ml.jpg)
&media=https://www.carcolor.hu/shop/7592-large_default/car-fit-1k-hi-build-primer-filler-spray-white-400-ml.jpg)
&media=https://www.carcolor.hu/shop/7590-large_default/car-fit-1k-hi-build-primer-filler-spray-black-400-ml.jpg)
&media=https://www.carcolor.hu/shop/12028-large_default/spraymax-2k-epoxy-primer-filler-400ml.jpg)
&media=https://www.carcolor.hu/shop/12037-large_default/spraymax-2k-wash-primer-250ml.jpg)
Leave a Comment
Leave a Reply
Please login to post a comment.