DIY Alloy Wheel Refurbishment Kit
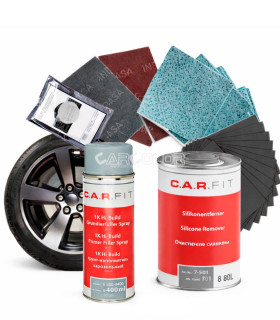
The alloy wheel refurbishment kit is a complete DIY package for cosmetic restoration of alloy wheels and other suitable metal rims. It combines the main sanding, cleaning, priming, masking and painting materials required for the different stages of the job.
It is designed to make restoring worn, scratched or cosmetically damaged wheels easier without having to select every preparation product separately.
What Is Included in the Wheel Refurbishment Kit?
The current DIY wheel repair kit contains the main products required from initial surface preparation through to painting:
- 1 selectable wheel paint aerosol,
- 1 aerosol primer surfacer,
- Indasa P120 abrasive papers,
- Indasa P240 abrasive papers,
- Indasa P400 abrasive papers,
- Indasa P800 abrasive papers,
- grey scuff pad for fine surface preparation,
- silicone remover for degreasing,
- 25 mm masking tape,
- Staubfix tack cloths,
- degreasing cloths.
Always check the individual product page for the exact current kit contents and available paint colours.
What Type of Wheel Damage Can Be Restored?
The kit is intended primarily for cosmetic surface restoration. With correct preparation, it can be used for defects such as:
- surface scratches,
- minor scuffs,
- worn paint,
- chipped or damaged coating,
- discoloured or aged finishes,
- minor surface corrosion after correct removal,
- repainting previously repaired wheels.
This is not a structural wheel repair system. Cracked, bent, heavily corroded or mechanically damaged wheels should be inspected by a suitable wheel-repair specialist.
How to Refurbish Alloy Wheels at Home
Good preparation is just as important as the final paint. A typical wheel refurbishment process can include:
- Cleaning – remove brake dust, road dirt and other contamination.
- Degreasing – clean the repair area with silicone remover.
- Sanding – remove damaged paint and progressively refine the surface.
- Masking – protect the tyre and any areas that should not be painted.
- Priming – apply primer surfacer where required to prepare a uniform base.
- Fine sanding – refine the dried primer before painting.
- Cleaning and dust removal – ensure the surface is clean and contamination-free.
- Applying wheel paint aerosol – build the finish with controlled, even coats.
Always follow the technical instructions and drying times for each individual product.
Selectable Wheel Paint Colours
The kit is available with a choice of wheel paint aerosols, allowing the final appearance to be selected according to the required style.
Current options include colours such as silver, black, white, gold and steel-type finishes. Always check the product page for the latest available choices.
If you need an exact match to an original manufacturer wheel finish, remember that a general wheel-paint colour may not exactly reproduce the original factory coating.
Why Correct Sanding Matters
Correct surface preparation is essential for paint adhesion and a smooth finished appearance. Loose or poorly adhering coatings should be removed and the edges of damaged areas should be blended progressively.
The kit provides several abrasive grades for progressive sanding, allowing the surface to be refined from initial preparation through to a finer paint-ready finish.
Not every repair needs to start with the coarsest abrasive. Select the initial grade according to the actual condition of the wheel.
Primer Surfacer Before Wheel Paint
The included primer surfacer aerosol helps create a more uniform base over correctly prepared areas and can refine minor sanding marks within the limits specified for the product.
After drying, the primer can be refined with fine abrasive before the surface is cleaned and prepared for wheel paint.
If a larger area of bare metal or aluminium is exposed, confirm that the selected primer system is suitable for the substrate and follow the manufacturer's technical instructions.
Degreasing Before Painting
Grease, silicone, polishing residue and other contamination can cause adhesion and surface defects. Thorough degreasing with silicone remover is therefore an important part of wheel preparation.
Before painting, the surface should be clean, dry and free from dust. A tack cloth helps remove the final fine particles immediately before coating.
Painting Wheels with Aerosol Paint
An aerosol system allows smaller wheel-refinishing jobs to be carried out without a compressor or spray gun. A consistent spray distance, controlled overlap and several light coats are important for an even finish.
Avoid trying to achieve complete coverage with one heavy coat, as excessive application can lead to runs, slower drying and an uneven surface.
Wheel Refurbishment Video Guide
A video guide is also available for the restoration process. It demonstrates the main stages from surface preparation and sanding through to priming and painting.
This can be particularly useful if you are carrying out a DIY alloy-wheel refurbishment for the first time.
When Is a DIY Wheel Repair Kit Not Enough?
This kit is designed for cosmetic surface refurbishment and does not replace structural wheel repair.
Professional inspection is required if the wheel is:
- cracked,
- bent or deformed,
- severely corroded,
- deeply damaged around the rim or spokes,
- causing air loss or running problems.
A road wheel is a safety-critical vehicle component, so structural damage should only be assessed and repaired by a suitably qualified specialist.
A Complete System for Cosmetic Wheel Restoration
The main advantage of a complete wheel refurbishment kit is that the abrasives, primer, cleaning products, masking materials and paint do not need to be selected individually.
For DIY restoration of worn or scratched alloy wheels, the complete aerosol-based kit and accompanying video guide provide a practical starting point for the entire cosmetic refinishing process.
Frequently Asked Questions About Alloy Wheel Refurbishment Kits
What is included in the alloy wheel refurbishment kit?
The current kit includes selectable wheel paint aerosol, primer surfacer aerosol, several abrasive grades, a grey scuff pad, silicone remover, masking tape, tack cloths and degreasing cloths.
Can the kit be used on alloy wheels?
Yes. It is designed for cosmetic surface refurbishment of alloy wheels and other suitable metal rims. Always confirm that the selected primer and paint system is compatible with the prepared substrate.
Which wheel paint colours are available?
The current kit offers several options including silver, black, white, gold and steel-type wheel paint. Check the product page for the current selection.
Can the kit repair kerb damage?
Minor cosmetic scuffs and paint damage can be refinished after suitable preparation. Deep material loss, cracks, deformation or structural damage require specialist wheel repair.
Do I need a spray gun or compressor?
No. The primer and wheel paint are aerosol products, so a separate spray gun and compressor are not required for application.
Is there a wheel refurbishment video?
Yes. A video guide is available showing the main wheel-refurbishment stages from preparation and sanding through to priming and painting.


 English
 Magyar
